
VCAP-DTA Objective 1.3 – Deploy and Configure a View Security Server
So as you probably recall from your VCP studies, a Security Server is essentially a chopped down version of a Connection Server that generally runs in a DMZ or other isolated part of your network, usually leveraged to authenticate public internet facing connections. The Security Server is “paired” with a Connection Server and as such provides access to desktop pools over a highly secure connection using the View Client.
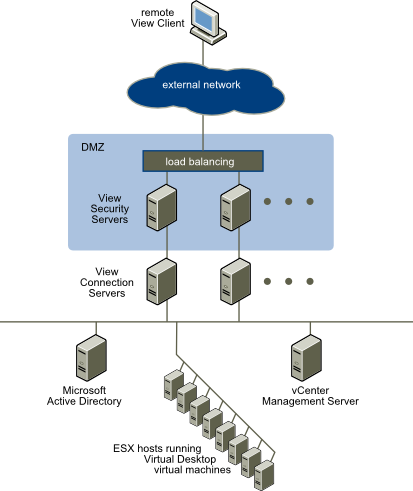
Again our reference materials are listed as the View Architecture Planning and View Installation guides, so no fiddling around with third party firewalls. My guess here is that we simply have to manipulate the Windows Server firewall to allow the necessary traffic through. The diagram below illustrates a sample View Security Server deployment and is taken from the View Architecture Planning Guide.
So without further ado, what’s on the blueprint for this objective?
-
Configure and enable firewall ports and rules. As I mentioned above, the lack of any reference point outside of the standard View documents leads me to think we won’t have to tinker with any third party firewalls. And thank heavens for that, life is complicated enough! You basically need to keep in mind two sets of firewall rules – what ports do I need to expose to the internet and what ports do I need to expose from the DMZ to my internal network? VMware KB article 1027217 summarises things pretty well, the information is shown below :-
Back-End Firewall Rules
| Source | Destination | Port | Protocol |
| Security Server | View Transfer Server | 80 | HTTP |
| Security Server | View Transfer Server | 443 | HTTPS |
| Security Server | Connection Server | 8009 | AJP13 |
| Security Server | Connection Server | 4001 | JMS |
| Security Server | View Desktop | 3389 | RDP |
| Security Server 1 | View Desktop | 4172 | PCoIP (TCP and UDP) |
| Security Server | View Desktop | 32111 | USB Redirection |
| Security Server | Connection Server | 500 | IPSec (UDP) |
| Security Server | Connection Server | 4500 | NAT-T ISAKMP (UDP) |
| Connection Server | Security Server | 500 | IPSec (UDP) |
| Connection Server | Security Server | 4500 | NAT-T ISAKMP (UDP) |
Front-End Firewall Rules
| Source | Destination | Port | Protocol |
| Any External IP | Security Server | 80 | HTTP |
| Any External IP | Security Server | 443 | HTTPS |
| Any External IP | Security Server1 | 4172 | PCoIP (TCP and UDP) |
It’s worth remembering that if you get stuck during the exam and you can’t remember a port or service you need to poke through the firewall, the product documentation is available for you to search. Don’t rely on this though – it’s very much a “Plan B” and will take a decent chunk of time away from you.
- Deploy and administer a View security server – the Security Server is pretty straight forward to deploy. Go into View Administrator and configure a pairing password on the Connection Server that you want to pair with the Security Server. Run the Connection Server installation and select Security Server. From there, it’s pretty much a “next, next, finish” exercise.
- Enable secure tunneling for PCoIP and RDP – Configure the secure tunnel URLs in View Administrator, if appropriate. Remember that the Secure Tunnel URL is always a “name” or FQDN with a port appended, so https://securetunnel.acme.com:443 for example (I have a feeling this sort of thing may turn up in the exam as a troubleshooting scenario) and the PCoIP URL is always an IP address, so 192.168.31.3:4172 for example. For a Security Server, remember this has tunnel settings too, so you may be asked to alter the external address in the exam.
- Configure certificates for View Security Server – The certificate process for the Security Server is exactly the same as the Connection Server. For the exam, I’m going to speculate that they’ve already minted one for you, and you have to install and configure the Security Server to use it. So in brief again :-
- Start MMC and add the Certificates snapin
- Import the server certificate into the Personal store and change the friendly name to vdm
- Import the root certificate into the certificates store, and the intermediate too, if you have one
- Restart the Security Server service (or reboot, but I wouldn’t do that in an exam!)
- Configure Smartcard or two-factor authentication for external access – Requires an existing RSA SecureID or similar setup, again I don’t expect to have to manage this in the exam. We’ll just focus on configuring View to use an existing infrastructure. Steps taken from the View 5.2 Installation Guide.
- In View Administrator, select View Configuration | Servers | Select the Connection Server you wish to enable
- On the authentication tab, select RSA SecureID or RADIUS. To force RSA SecurID or RADIUS user names to match user names in Active Directory, select Enforce SecurID and Windows user name matching or Enforce 2-factor and Windows user name matching. If you select this option, users must use the same RSA SecurID or RADIUS user name for Active Directory authentication. If you do not select this option, the names can be different.
- For RSA SecurID, click Upload File, type the location of the sdconf.rec file, or click Browse to search for the file
- For RADIUS authentication, Select Use the same username and password for RADIUS and Windows authentication if the initial RADIUS authentication uses Windows authentication that triggers an out-of-band transmission of a token code, and this token code is used as part of a RADIUS challenge. If you select this check box, users will not be prompted for Windows credentials after RADIUS authentication if the RADIUS authentication uses the Windows username and password. Users do not have to reenter the Windows username and password after RADIUS authentication.
- From the Authenticator drop-down list, select Create New Authenticator and complete the page.
-
Set Accounting port to 0
unless you want to enable RADIUS accounting. Set this port to a non-zero number only if your RADIUS server supports collecting accounting data. If the RADIUS server does not support accounting messages and you set this port to a nonzero number, the messages will be sent and ignored and retried a number of times, resulting in a delay in authentication.
Accounting data can be used in order to bill users based on usage time and data. Accounting data can also be used for statistical purposes and for general network monitoring.
- If you specify a realm prefix string, the string is placed at the beginning of the username when it is sent to the RADIUS server. For example, if the username entered in the View Client is jdoe and the realm prefix DOMAIN-A\ is specified, the username DOMAIN-A\jdoe is sent to the RADIUS server. Similarly if you use the realm suffix, or postfix, string @mycorp.com, the username jdoe@mycorp.com is sent to the RADIUS server.
- Click OK to save changes. A Connection Server service or server restart is not required as the settings take effect immediately. When you connect to this Connection Server using two factor authentication, the prompts will reflect this for the end user.
