
VCAP-DTA Section 8 – Secure a View Implementation
Objective 8.1 – Configure and Deploy Certificates
Section 8 assumes we now have a fully upgraded and working View 5.2 pod and end users are happy as we’ve sorted out their clients. Now we have to circle back and look at ways of locking down and securing the View pod against unauthorised access.
- Configure 2 Factor/Smart Card Authentication including truststore – 2 Factor authentication is configured on a per Connection Server basis. So go into View Administrator, select View Configuration, Servers and then the Connection Server tab. Select the Connection Server you want to configure for two factor authentication and select Edit. Click the Authentication tab and you’ll see the dialog as shown below.
- You must first obtain the root Certificate Authority certificate from the CA being used to sign the certificates on the smart cards
- Use the keytool utility to import the CA certificate into the server truststore file using the command syntax keytool -import -alias alias -file root_certificate -keystore truststorefile.key
- Copy the truststore file into the sslgateway folder on either the Connection or Security Server, depending on the scenario. This is typically located at %PROGRAMFILES%\VMware\VMware View\Server\sslgateway\conf\
- Smartcard authentication has three options in the drop down, Not Allowed, Optional, Required. Choose the appropriate option. You can also check the box to disconnect sessions on smart card removal, for added security.

- In the Advanced Authentication section, choose whether 2 Factor authentication is Disabled, RSA SecurID or RADIUS. For exam purposes, I’m assuming it will be RADIUS as this is not a proprietary solution.
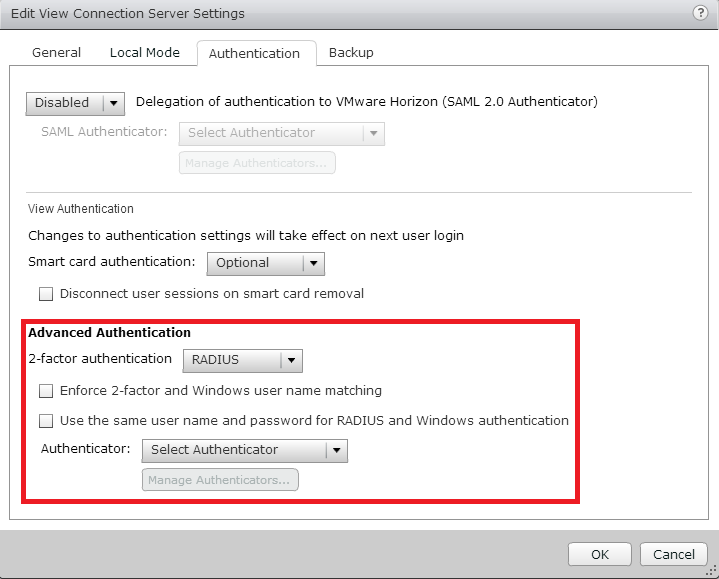
- With RADIUS selected, choose whether to Enforce 2-factor and Windows user name matching and/or Use the same user name and password for RADIUS and Windows authentication.
- In the Authenticator drop box, choose Create New Authenticator and fill out the RADIUS server details similar to below:-
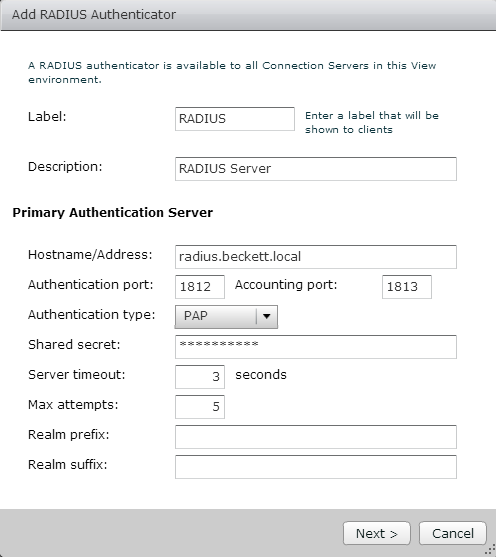
- Complete the wizard to finish the setup of RADIUS.
- Configure and deploy View certificates – By default, View Connection and Security Servers use self signed certificates. This in itself is fine and will work, but you will see warnings in View Administrator to say these certificates aren’t trusted as they weren’t issued by a trusted Certificate Authority. In order to secure your Connection and Security servers, you will need to perform the following process:-
- Create a Certificate Signing Request (CSR) from the server you wish to add a trusted certificate to (you can use Windows certreq tool to do this). The View documentation has a request.inf file you can re-use for this purpose (certificate must be in PKCS12 format)
- Obtain a signed certificate from the issuing CA
- Verify the CSR and the private key are stored in the local computer’s certificate store by running certmgr.msc and looking in the Certificate Enrolment Request folder
- Import the certificate into the local store using certreq -accept cert.cer
- Once the certificate is imported, in Certificate Management, add the friendly name of vdm to the certificate and install the root CA and intermediate (if appropriate) certificate into the certificate store
- Restart the Connection, Security or Composer Services for the changes to take effect
- Configure certificate revocation checking using the locked.properties file – Certificate Revocation is another security step which prevents SSL certificates that have been listed as revoked by the issuer to be reused for secure services. In order to configure View to use certificate revocation lists (CRL), you need to amend the locked.properties file which can be found in %PROGRAMFILES%\VMware\VMware View\Server\sslgateway\conf\ with the following lines:-
-
enableRevocationChecking=true
enableOCSP=true
allowCertCRLs=true
ocspSigningCert=te-ca.signing.cer
ocspURL=http://te-ca.lonqa.int/ocsp
- Where ocspURL is the URL of the OCSP Responder. Note the above is used for smartcard certificate checking, View server certificates have CRL checking built in.
- If you are using your own CA and cannot include CRL information in the certificate, amend the CertificateRevocationCheckType registry key under HKLM\Software\VMware, Inc.\VMware VDM\Security and set the appropriate level as below:-
- 1 – Do not perform CRL checking
- 2 – Only check the server certificate, don’t check any other certificates in the chain
- 3 – Check all certificates in the chain
- 4 – Check all certificates except the root (default)
-
- Perform a certificate replacement using sviconfig – Adding a certificate to View Composer follows pretty much the same steps as above (Create CSR, get signed certificate, import certificate) but with one additional step. Stop the View Composer service and run the command sviconfig -operation=ReplaceCertificate -delete=false to use the new certificate added to the local certificate store. The delete=false option is mandatory and false will not delete the old certificate from the Windows certificate store. Enter the number of the certificate you wish to use and then finally restart the View Composer service for all changes to take effect.
Objective 8.2 – Harden View Components and View Desktops
- Open firewall ports used by View components – Regardless of whether you need to change the server or client end firewall settings, this is done via Firewall.cpl or Windows Firewall, depending on how you prefer to run these things. By default during View component installation, if the installer detects Windows Firewall is running, it will attempt to make the required firewall changes to allow View to operate, so ports such as 80, 443 (HTTP(s) for authentication), 1472 (PCoIP), 3389 (RDP), 32111 (USB redirection), 9427 (MMR), 4001 (JMS), 50002 (PCoIP). Verify these ports are enabled at both ends where appropriate and ensure the correct protocol is used (UDP or TCP). Chances are in the exam you’ll be asked to add a firewall rule to facilitate a connection. Also don’t forget there are three firewall profiles – domain, private and public networks. Make sure this doesn’t catch you out. To make changes to the Windows Firewall, select Allow a program or feature through Windows Firewall. All installed VMware services should be listed, add a tick box to which services you want to allow through, as shown below:-

- Disable Windows services – View has several services it uses in the normal course of operations, including:-
- VMware View Connection Server
- VMware View Framework Component
- VMware View Script Host
- VMwareVDMDS
- Typically only the services required will be started automatically, but in the exam there may be a case of a service started that shouldn’t be, or vice versa. At a glance, the prime suspect would appear to be VMware View Script host, which is usually disabled but must be enabled if scripts are to be run against the server. To enable and disable services, go to Start | Run | services.msc. All View services are prefixed with “VMware”, so they’re all pretty easy to spot in the services list. Whichever service you wish to configure, right click and go Properties and change the Startup Type to Disabled, Manual or Automatic. You can also stop a service from this dialog.

- Configure appropriate message security mode – Message security mode assigns security to JMS messages, which the method that View components use to communicate with each other. By default, this setting is enabled so all JMS messages that are not signed correctly are rejected. This can be amended to disabled or mixed, where message security is enabled but not enforced. Generally this setting is only required with legacy versions of View (3.0 or earlier). To configure this setting, go to View Administrator and then View Configuration | Global Settings | Security Pane Edit and choose the required mode from the drop box as shown below:-

- Configure SSL for appropriate View functions – By default, View uses HTTPS redirection already for View client and administration traffic, in addition to Local Mode SSL encryption. As this is already enabled by default, I can only surmise that it will have been disabled somewhere for the purposes of the exam. Also, ensure the link to vCenter goes over port 443 and the View Composer port is 18443 by default, which is also secure. All of this is configured from View Administrator, under View Configuration | Servers. Select the vCenter Server or Connection Server you wish to configure and select Edit to make the required changes. The Local Mode settings are under the Connection Server under the Local Mode tab.
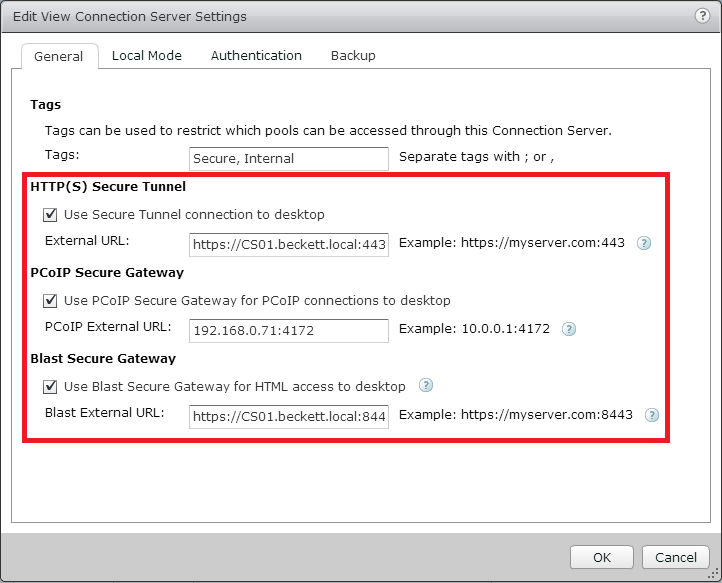
- Configure secure tunneling – Secure tunneling is used when additional security or direct connections to the virtual desktops are not possible or desirable. All three protocol methods (RDP, PCoIP and HTML/Blast) have their own secure gateway tunnel and this is configured from within View Administrator. Go to View Configuration | Servers | Connection Servers and click Edit. From here, the General tab lists all gateways where they can be enabled/disabled and configured. Simply check the box next to the gateway to enable it and change any URLs/ports as required, as shown below. Remember the PCoIP Secure Tunnel URL Is always an IP address!
- Configure security settings in the View Agent Configuration Template – To configure security settings for the View Agent, you need to add the ADM template file into Group Policy Management (or you can add it in locally to your master image). The file is called vdm_agent.adm and can be found on the Connection Server under %PROGRAMFILES%\VMware\VMware View\Server\extras\GroupPolicyFiles. Once added into Group Policy Management, various options can be set as shown below, including:-
- USB Configuration (allow/disallow USB device types, models etc.)
- Agent Configuration (Commands to run on connect/reconnect etc.)
- Agent Security (allow unencrypted connections from older legacy devices)

VCAP-DTA Section 9 – Configure Persona Management for a View Implementation
Objective 9.1 – Deploy a Persona Management Solution
- Create a Persona Management repository – To create a View Persona Management (VPM) respository, simply create a regular file share on a Windows server on the network. This can be a NAS device or a Windows Server, it doesn’t really matter. When creating the VPM share, note the following guidelines from the View Persona Management guide:-
- The shared folder does not have to be in the same domain as View Connection Server
- The shared folder must be in the same Active Directory forest as the users who store profiles in the shared folder
- You must use a shared drive that is large enough to store the user profile information for your users. To support a large View deployment, you can configure separate repositories for different desktop pools
- If users are entitled to more than one pool, the pools that share users must be configured with the same profile repository. If you entitle a user to two pools with two different profile repositories, the user cannot access the same version of the profile from desktops in each pool
- You must create the full profile path under which the user profile folders will be created. If part of the path does not exist, Windows creates the missing folders when the first user logs in and assigns the user’s security restrictions to those folders. Windows assigns the same security restrictions to every folder it creates under that path
- For example, for user1 you might configure the View Persona Management path \\server\VPRepository\profiles\user1. If you create the network share \\server\VPRepository, and the profiles folder does not exist, Windows creates the path \profiles\user1 when user1 logs in. Windows restricts access to the \profiles\user1 folders to the user1 account. If another user logs in with a profile path in\\server\VPRepository\profiles, the second user cannot access the repository and the user’s profile fails to be replicated
- Implement optimized Persona Management GPOs – To add VPM group policies, you first need to add in the ADM template file to Group Policy Management. You can add it locally to a parent image, but then you will lose management control. To enable management domain wide, adding the template into Group Policy Management and linking it to an OU in Active Directory is preferred. The ADM template is called ViewPM.adm and can be found on a Connection Server under %PROGRAMFILES%\VMware\VMware View\Server\extras\GroupPolicyFiles. Once added into Group Policy Management, the following settings folders are available:-
- Roaming and synchronization
- Folder redirection
- Desktop UI
- Logging
- There are dozens of different settings available to VPM in the group policy, so the exam will probably have some specific requirements on you to configure. Two settings you will need are the first settings in the Roaming and synchronization folder, Manage User Persona and Persona Repository Location. Set the first setting to Enabled to switch on VPM, and here you can change the default synch period from 10 minutes to something else. For Persona Repository Location, set this to Enabled and configure the UNC path to the share you previously configured, \\dc01.beckett.local\VPRepository for example.

- Implement optimized Windows Roaming Profiles with Persona Management – There may be some cases whereby you do not want to constantly sync parts of the user profile every 10 minutes using VPM. Perhaps there is an application dependency. What you can do within the GPO is set some folders to be exempt from the ongoing sync process and only sync the changes to the VPM repository when a user logs off. To do this, go to your VPM group policy and set folder exceptions as shown below:-

Objective 9.2 – Migrate a Windows Profile
- Ensure pre-requisites are met for a profile migration – The pre-requisites from the View Admin guide are listed below:-
- Run the migration utility on a Windows 7 or Windows 8 physical computer or virtual machine
- Log in to the Windows 7 or Windows 8 system as a local administrator
- Verify that the system on which you run the utility has network access to the CIFS network shares that contain the source V1 path and destination V2 path
- Verify that the user account that runs the utility is a local administrator on the destination CIFS network share
- If the user account that runs the utility does not have full ownership of the user profiles that are migrated, specify the /takeownership option with the utility
- This option passes ownership of the user profile folders to the utility during the migration. Ownership is returned to the users after the migration is completed
- Ensure that the users whose profiles are being migrated are not logged in to their Windows XP systems when you initiate the migration
- If a user is in an active session during the migration, the migration might fail
- Ensure that users do not start using their Windows 7 or Windows 8 desktops before the migration is completed
- When users start using their View desktops, View Persona Management creates V2 profiles for the users. If a V2 profile already exists before the migration runs, the utility leaves the existing V2 profile in place and does not migrate the legacy V1 profile
- Perform profile migration using migprofile.exe – The migprofile.exe utility is installed with the View Agent and can be found under %PROGRAMFILES%\VMware\VMware View\Agent\bin or can be installed standalone. The utility can be used to migrate V1 profiles (Windows XP) en masse from a shared repository to another repository in V2 format, or used on a piecemeal basis to upgrade a user at a time, if required. The examples below are taken from the View Persona Management guide:-
-
migprofile.exe /s:\\file01\profiles\* /takeownership performs an in-place upgrade of profiles on a network share from V1 format to V2. The latter have the .V2 extension added to the profile folder
-
The following example migrates the V1 profile for the user ts115 on the computer devvm-winxp to the remote path \\file01\profiles. The utility takes ownership of the user profiles during the migration:
migprofile.exe /s:\\devvm-winxp\c$\documents and settings\ts115 /t:\\file01\profiles\ /takeownership
-
- Modify migration configuration file – The migprofile.exe utility can also apply settings from a settings file written in XML. This file uses XML tags to pre-populate migration settings and can be named anything as long as it has an XML extension. Using this settings file is specified on the command line when running the migration utility and for full details on the XML file format, please refer to VMware’s online guide. Typical tags include:-
-
<source> <profilepath>source_profile_path</profilepath> </source>
-
<target> <profilepath>target_profile_path</profilepath> </target>
-
<includefolders>Personal, Desktop, Start Menu, NetHood</includefolders> (Migrates only specified folders instead of all except Cache, History and Local AppData, by default)
-
- To run the migration utility with a settings.xml file, use the following syntax:-
- migprofile.exe migsettings.xml (where the latter file name is your settings file)
Section 10 – Troubleshoot a View Implementation
Objective 10.1 – Troubleshoot View Pool creation and administration issues
Interestingly, the exam blueprint doesn’t give you any real pointers as to what skills and abilities are being measured for this objective, so let’s have fun and speculate on some things that might occur that we need to troubleshoot during pool creation and administrative tasks:-
- Pool provisioning fails
- Check storage space
- Storage overcommit on linked clones
- View Agent is installed properly
- DNS resolution is working
- Windows Firewall issues
- View Composer service is available
- Users have entitlements to the pool
- User creating the pool has the correct permissions in View Administrator
- Drill into the pool in View Administrator and check the Events tab for hints as to what’s wrong
- Administration Issues
- Check the View Connection Server service is running
- Check Adobe Flash is installed in the browser
- Check the user has appropriate permissions
- Check the web browser is supported (chances are remote, but you never know)
- Check View Administrator session timeout (default is 30 minutes)
- Dashboard not updating – check Enable Automatic Status Updates is enabled in View Administrator
- Red lights in View Administrator dashboard – drill into them to get the events view to see what is wrong
- Verify vCenter permissions for any service accounts used for vCenter access, Composer provisioning etc.
Objective 10.2 – Troubleshoot View administration management framework issues
- Potential Framework Issues
- Can’t access View Administrator – check View Component Framework is running
- Can’t access View Administrator – check View Web Component service is running
- No Events being logged to the Events Database – check the Event Configuration is correct in View Administrator and SQL is up
- View not sending messages to Syslog server – check Syslog configuration under Event Configuration section
Objective 10.3 – Troubleshoot end user access
- Potential End User Issues
- Check Windows Firewall at both ends that ports 80,443,4172,3389 are open as a minimum
- Check the pairing between the Security and Connection Servers if appropriate
- Check tagging and that tag matching is providing the expected result
- Check certificate verification on the View Client is set appropriately
- Perform connectivity tests such as ping, nslookup etc
- Check the Connection Server service is running
- Check user entitlements to pools and desktops
- Check power settings and the user desktop has not gone into suspend mode or hibernation
- Check there are spare desktops provisioned and ready in a pool
- Verify display protocols are correctly matched at each end (PCoIP, RDP etc)
Objective 10.4 – Troubleshoot network, storage, and vSphere infrastructure related to View
- Potential Infrastructure Related Issues
- Check alarms in vCenter for any hardware issues
- Check access to vCenter for the Connection Server and View Composer
- Check vCenter permissions for service accounts, if they’re used
- Check host contention on ESXi hosts
- Check disk latencies on datastores if desktops are slow
- Verify connectivity between Connection Servers and Security Servers and ensure 1Gbps links between all
- Check SQL is healthy
- Check vSwitch settings are correct and there are no typos (VLAN numbers, Port Group names etc.)
- Check all vSwitch uplinks are working correctly
- Check for restrictions placed on virtual desktops by resource pool settings, DRS/HA etc not artificially constraining desktops
- Check Storage or Network I/O Control policies are not slowing the infrastructure down
