VCAP-DTA Objective 2.1 – Configure and Manage View Global Policies and Settings
Now we’ve got past upgrading, migrating and installing, it’s time to delve into some of the system wide settings in View. We’ve got (or should have) Connection Servers, Transfer Servers, Security Servers and Composer Servers. This objective focuses on global policies and global settings. So in the exam, remember these are most likely to be found at the “top level” of your View configuration, so you shouldn’t have to start going drilling into user and desktop settings. Keep that in mind if you’re asked to manipulate these settings in the exam.
That being said, there are certain settings that can be set explicitly instead of inherited. So for example, you may wish to disable USB access for everyone as you don’t want anyone plugging in a thumb drive and stealing your company assets! However, VIP users may require access, so you can configure an allow policy for them further down the tree, as it were.
So without further ado, the skills and abilities being tested :-
Enable and disable global policies – In View Administrator, in the left hand column is the section Policies. Open this out and you’ll see the Global Policies. You’ll be pleased to see there isn’t a great deal to set here, so hopefully as and when you’re asked to do something on the exam, it won’t told you up for too long. This screen is broken into two sections, View Policies and Local Mode Policies.
In the View Policies dialog, you can either allow or deny the following – Multimedia Redirection, USB Access, Remote Mode and PCoIP Hardware Acceleration. Click the Edit Policies button and make your choices.
Local Mode Policies is similar, but has a little more granularity to the settings. So as well as determining if a feature is available or not, you can also set policies for Max time without server contact, Target replication frequency and Disks replicated.
As I mentioned above, global policies don’t have to be a “one size fits all” scenario. Chances are in the exam, you’ll be asked to set a system wide policy to say disable USB Access but then set one pool to allow it. To do this, go to the pool, click the Policies tab, click Edit Policies and select USB Access to Allow. The diagram below illustrates this point and the right most column shows the effective setting, which is really useful to know!
Configure and modify global settings – Again these settings are accessed from the left most bar from the View Configuration section.
Click Global Settings and again you get a split pane view of General and Security settings. General has 7 settings – Session Timeout (default 600 seconds), SSO, View Administrator Session Timeout (default 30 mins, my bet is the exam will ask you to shorten this), Enable Automatic Status Updates (updates View Administrator dashboard every 5 mins. Another one I’d expect on the exam), Display A Pre-Login message, Display Warning Before Forced Logoff with sub option After warning, logoff after n minutes (default being 5 mins). There is also a free text box to display a warning, this may well feature on the exam.
Security Settings are pretty minimal too. Options here are Reauthenticate tunnel connections after network interruption, message security mode (JMS messages are signed and verified – Mixed means enabled but not enforced. Expect to be asked to enforce this on the exam), Enable IPsec for Security Server Pairing (unlikely you’ll be asked to change this), Disable Single Sign On For Local Mode Operations (disables pass through authentication to the desktop after logging into View).
And that’s it! This section is thankfully a short one. See you next time!
The purpose of this objective is to take all the major pieces of View, so think Connection Server, Security Server, Transfer Server, View Agent, View Client and View Composer and upgrade them to version 5.2, as this is the version the exam blueprint focuses on. In the skills and abilities section, there is basically a breakout for all the pieces as listed above.
I find it interesting that they call out specifically re-pairing Security Servers and enabling IPsec during the upgrade. This to me suggests that you can pretty much guarantee you’re going to see this during the exam, as to be honest, all the other pieces we just listed are pretty much “Next, Next, Finish” file copy jobs. You can actually upgrade the Connection Server without having to reboot at the end, but I always think it good practice to give it one last reboot afterwards to ensure you have all the right file versions loaded into memory.
Upgrade View Connection Server – As I just said, this is a very straight forward task, so maybe there’s an unforeseen curveball in here somewhere. The only one I can really think of is to check 5.2 pre-requisites have been met, so Windows 2008 R2 64 bit, 4 vCPU, 1Gbps NIC, minimum 4GB RAM (you won’t be servicing 50 concurrent connections in an exam!). Also make sure you license the thing – coming from an older version (4.x series), the license key will be different. Also remember that self signed certificates are a big no no now, so you may have to make changes there (see earlier sections for details). If this Connection Server will be paired with a Security Server, check Windows Firewall is set to on as IPsec requires this. Potential test scenario right there! Know how to accept the self signed certificate if you’re asked that on the exam. View Administrator, click Verify on the alert.
Upgrade View Security Server – Check the Connection Server you pair with has already been upgraded first. Configure the pairing password in View Administrator before running the installer. The installation guide suggests checking the Security Server shows the correct version after the upgrade in View Administrator and remove any duplicate entries which can sometimes occur. With regard to IPsec, select the Security Server in View Administrator and select More Commands, Prepare For Upgrade or Reinstallation. If the old IPsec rules have not been removed, the pairing will fail. Sounds like another potential exam pitfall!
Upgrade View Transfer Server – As a pre-requisite, ensure that Connection and Composer servers have been upgraded to 5.2. Backup your CA signed certificate first if you’re using one, it’s stored in install_directory\VMware\VMware View\Server\httpd\conf.
Put the Transfer Server into maintenance mode, go to the Transfer Servers tab, select the Transfer Server you plan to upgrade and select Enter Maintenance Mode. Wait until the status changes before continuing!
Run the installer as administrator and once completed successfully, go back into the Transfer Servers tab, select the server you just upgraded and select Exit Maintenance Mode.
You may be asked to install a net new Transfer Server – this is pretty straightforward. Go to the VM on which you want to install the Transfer Server and run through the short installer. Once complete, go to View Administrator and the Transfer Servers tab. Configure the new Transfer Server to use the file repository if that is what the scenario demands. You can then remove the old Transfer Server instance and uninstall the software from the original VM. I like the sound of this for an exam scenario!
Upgrade View Agent – Again meet the pre-reqs which state at least one Connection Server in the replicated group is at version 5.2. If local mode desktops are also in the mix, check View Composer and View Transfer Servers are also at 5.2. The installer also needs local admin rights on the VM.
Run the short installer to upgrade the View Agent piece on the desktop VM
If you have a linked clone pool, you will need to upgrade the master image agent, take a snapshot of this and then recompose the pool. Sounds like something you’d find in the exam to me!
Full clone desktops will need to be upgraded one by one by hand (doubt there will be SCCM in the exam!)
Once complete, verify connectivity by logging into the desktop. You can quickly check the version of agent in the View Administrator, Desktops dialog. Ensure the VDI status reads “available”
Upgrade View Client – Again another very straightforward task. Remember you can get the latest client by hitting the Connection Server with a web browser which gives you the View Portal. Select the appropriate client version (32/64 bit, with/without local mode) and follow the bouncing ball. Once complete, verify connectivity.
Upgrade View Composer – There’s no mention of migrating View Composer to another server, but that’s been covered previously. You may need to configure a CA signed SSL certificate before you run the installer, again see previous steps on how to do this. You can then let the installer upgrade the Composer database or you can do it manually. I don’t see how the exam can ask you to do it by hand, but in case they do, remember to use the SviConfig after the installer has completed.
Remember the View Composer port number is 18443, in case you need it for View Administrator and hooking up to a vCenter.
For details on migrating View Composer to a stand alone instance, see notes for Objective 1.2. I consider it likely you’ll be asked to stand up a standalone Composer server and then upgrade it in place.
VCAP-DTA Objective 1.4 – Deploy and Configure View Transfer Server
So we’ve deployed Connection Servers, Security Servers and now it’s the turn of the Transfer Server. Remember this is kind of a Connection Server that has the responsibility of checking local mode desktops in and out. Thinking out loud about how this might turn up the exam, I’m thinking that you’ll probably have to run through the installation of one, but I’m struggling to think that you’ll be asked to check a desktop out simply because of the time it takes. I could be wrong, but three hours is not long to get all of this stuff done!
So again a Transfer Server is stood up by running the Connection Server installation executable. No seperate installer for this component. There are a number of things to bear in mind, which hopefully will be covered below in the skills and abilities section of the exam blueprint.
Configure storage for View Transfer Server and the repository – OK, so this strictly doesn’t say you’ll be installing a Transfer Server, so do we assume it’s already stood up? Remember from the install and architecture guides :-
Must be a virtual machine, for the exam I think that’s a given!
Requires Windows 2008 R2 64 Bit, 4Gb RAM, 2 vCPU, 20GB disk space, LSI Logic Parallel or SAS adapter (sounds like something that might come out of a troubleshooting scenario – “Why won’t Transfer Server install?”), 1GB E1000 vNIC (you need bandwidth to check desktops in and out, of course)
Must be managed by same vCenter as the desktops you want to check out
Must have static IP address and does not need to be domain joined
Can’t co-exist with any other View component such as Connection Server, View Client etc
The installation of a Transfer Server is essentially a two step process – installing the beast and then configuring it in View Administrator. Don’t forget the second part or your Transfer Server is useless!
Run the Connection Server installer, select View Transfer Server and fill in details for Network Domain (somewhere.com), Server Name (FQDN) and Administrator’s e-mail address (a.bloke@acme.com, for example)
Install and off we go.
Click Finish when the file copy and installation is complete, then we have to make the necessary changes to View Administrator
In View Administrator, go to View Configuration | Servers, Transfer Servers tab. Click Add and select the vCenter server your Transfer Server is managed by. Click Next and select your Transfer Server, click Finish.
To complete the install, you also need to create and specify a transfer repository. This can be either a local folder on the Transfer Server, or better yet, a UNC path that can be shared among multiple Transfer Servers.
Before you specify a repository path, you need to place your Transfer Server into maintenance mode. To do that, highlight your Transfer Server in View Administrator and click Enter Maintenance Mode.
In the Transfer Server Repository section at the bottom of the page, click Edit on the General Tab and select network share path or local path and select OK. Don’t forget to take your Transfer Server out of maintenance mode to complete the task!
Configure the View Transfer Server firewall – chances are you won’t have to do much here. If Windows Firewall is already enabled, verify that the Connection Server is allowed out over HTTP and HTTPS, paying special attention to the domain, home/work and public scopes, they might try and trip you up on this step. The good news is Transfer Server works over good old ports 80 and 443, so no wacky port numbers to remember here.
Configure security policies for Local Mode – Again a relatively straightforward step if you know where to look. In View Administrator, open the Policies branch in the left pane and click Global Policies. There is a specific section for Local Mode Policies, so click on Edit Policies and select the appropriate policies for the exam scenario. For example, you may be asked to change the max time without server contact from the default 7 days to say 3 days (be surprised if they ask you to go unlimited). Disks Replicated also strikes me as something you may be asked to change, for example from the default Persistent Disks to OS and Persistent Disks.
VCAP-DTA Objective 1.3 – Deploy and Configure a View Security Server
So as you probably recall from your VCP studies, a Security Server is essentially a chopped down version of a Connection Server that generally runs in a DMZ or other isolated part of your network, usually leveraged to authenticate public internet facing connections. The Security Server is “paired” with a Connection Server and as such provides access to desktop pools over a highly secure connection using the View Client.
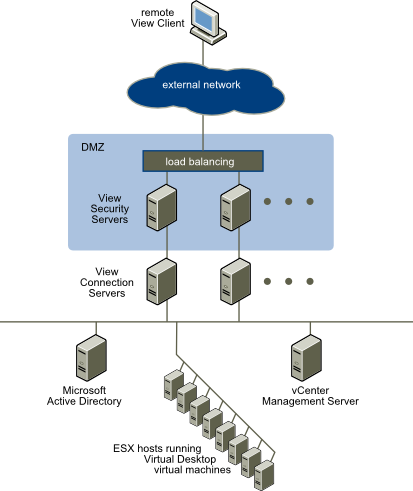
Again our reference materials are listed as the View Architecture Planning and View Installation guides, so no fiddling around with third party firewalls. My guess here is that we simply have to manipulate the Windows Server firewall to allow the necessary traffic through. The diagram below illustrates a sample View Security Server deployment and is taken from the View Architecture Planning Guide.
So without further ado, what’s on the blueprint for this objective?
Configure and enable firewall ports and rules. As I mentioned above, the lack of any reference point outside of the standard View documents leads me to think we won’t have to tinker with any third party firewalls. And thank heavens for that, life is complicated enough! You basically need to keep in mind two sets of firewall rules – what ports do I need to expose to the internet and what ports do I need to expose from the DMZ to my internal network? VMware KB article 1027217 summarises things pretty well, the information is shown below :-
Back-End Firewall Rules
Source
Destination
Port
Protocol
Security Server
View Transfer Server
80
HTTP
Security Server
View Transfer Server
443
HTTPS
Security Server
Connection Server
8009
AJP13
Security Server
Connection Server
4001
JMS
Security Server
View Desktop
3389
RDP
Security Server 1
View Desktop
4172
PCoIP (TCP and UDP)
Security Server
View Desktop
32111
USB Redirection
Security Server
Connection Server
500
IPSec (UDP)
Security Server
Connection Server
4500
NAT-T ISAKMP (UDP)
Connection Server
Security Server
500
IPSec (UDP)
Connection Server
Security Server
4500
NAT-T ISAKMP (UDP)
Front-End Firewall Rules
Source
Destination
Port
Protocol
Any External IP
Security Server
80
HTTP
Any External IP
Security Server
443
HTTPS
Any External IP
Security Server1
4172
PCoIP (TCP and UDP)
It’s worth remembering that if you get stuck during the exam and you can’t remember a port or service you need to poke through the firewall, the product documentation is available for you to search. Don’t rely on this though – it’s very much a “Plan B” and will take a decent chunk of time away from you.
Deploy and administer a View security server – the Security Server is pretty straight forward to deploy. Go into View Administrator and configure a pairing password on the Connection Server that you want to pair with the Security Server. Run the Connection Server installation and select Security Server. From there, it’s pretty much a “next, next, finish” exercise.
Enable secure tunneling for PCoIP and RDP – Configure the secure tunnel URLs in View Administrator, if appropriate. Remember that the Secure Tunnel URL is always a “name” or FQDN with a port appended, so https://securetunnel.acme.com:443 for example (I have a feeling this sort of thing may turn up in the exam as a troubleshooting scenario) and the PCoIP URL is always an IP address, so 192.168.31.3:4172 for example. For a Security Server, remember this has tunnel settings too, so you may be asked to alter the external address in the exam.
Configure certificates for View Security Server – The certificate process for the Security Server is exactly the same as the Connection Server. For the exam, I’m going to speculate that they’ve already minted one for you, and you have to install and configure the Security Server to use it. So in brief again :-
Start MMC and add the Certificates snapin
Import the server certificate into the Personal store and change the friendly name to vdm
Import the root certificate into the certificates store, and the intermediate too, if you have one
Restart the Security Server service (or reboot, but I wouldn’t do that in an exam!)
Configure Smartcard or two-factor authentication for external access – Requires an existing RSA SecureID or similar setup, again I don’t expect to have to manage this in the exam. We’ll just focus on configuring View to use an existing infrastructure. Steps taken from the View 5.2 Installation Guide.
In View Administrator, select View Configuration | Servers | Select the Connection Server you wish to enable
On the authentication tab, select RSA SecureID or RADIUS. To force RSA SecurID or RADIUS user names to match user names in Active Directory, select Enforce SecurID and Windows user name matching or Enforce 2-factor and Windows user name matching. If you select this option, users must use the same RSA SecurID or RADIUS user name for Active Directory authentication. If you do not select this option, the names can be different.
For RSA SecurID, click Upload File, type the location of the sdconf.rec file, or click Browse to search for the file
For RADIUS authentication, Select Use the same username and password for RADIUS and Windows authentication if the initial RADIUS authentication uses Windows authentication that triggers an out-of-band transmission of a token code, and this token code is used as part of a RADIUS challenge. If you select this check box, users will not be prompted for Windows credentials after RADIUS authentication if the RADIUS authentication uses the Windows username and password. Users do not have to reenter the Windows username and password after RADIUS authentication.
From the Authenticator drop-down list, select Create New Authenticator and complete the page.
Set Accounting port to 0
unless you want to enable RADIUS accounting. Set this port to a non-zero number only if your RADIUS server supports collecting accounting data. If the RADIUS server does not support accounting messages and you set this port to a nonzero number, the messages will be sent and ignored and retried a number of times, resulting in a delay in authentication.
Accounting data can be used in order to bill users based on usage time and data. Accounting data can also be used for statistical purposes and for general network monitoring.
If you specify a realm prefix string, the string is placed at the beginning of the username when it is sent to the RADIUS server. For example, if the username entered in the View Client is jdoe and the realm prefix DOMAIN-A\ is specified, the username DOMAIN-A\jdoe is sent to the RADIUS server. Similarly if you use the realm suffix, or postfix, string @mycorp.com, the username jdoe@mycorp.com is sent to the RADIUS server.
Click OK to save changes. A Connection Server service or server restart is not required as the settings take effect immediately. When you connect to this Connection Server using two factor authentication, the prompts will reflect this for the end user.
VCAP-DTA Objective 1.2 – Deploy and configure View Composer
So in case you forgot, View Composer is the optional View component that allows us to provision linked clone desktops. It used to be that in older versions of View (5.0 backwards, as far as I remember), you had to install View Composer on the same Windows server as vCenter, the two could simply not live apart. However, in 5.1 and newer, this dependency was broken and you can now put View Composer on it’s own Windows server, away from vCenter Server. When I went on the View 5.1 ICM course, we ruminated that this was mainly for vCenter Server Appliance customers who also used View.
One of the limitations of this setup was that as the VCSA is a Linux box, you can’t really stack Composer on top of this in any meaningful way. So to workaround this and give customers a choice of vCenter platform, View Composer became effectively a “stand alone” component away from vCenter.
So in terms of skills being measured, this is what we need to know :-
Install, Configure and Upgrade View Composer. Hmm, OK. Right. So I would guess it’s likely we’ll have to both install and upgrade Composer, as there are a couple of vCenters and therefore most likely a couple of desktop pods. So what is required?
Create a database for View Composer. If you’re a SQL shop, anything from 2005 upwards looks good. If you’re an Oracle shop, 10g R2 and above. To be honest, I’d expect the database to already exist. Again it comes down to what the exam blueprint is asking you to do, and you are not pointed towards database documentation, so it should already be there, albeit in an empty state.
Windows 2008 R2 and above server
4 vCPU, 8GB and 60GB disk space. Again I wouldn’t expect to be asked to provision this VM, I’d expect it to be there, ready for some Composer goodness. This is only a 3 hour exam, remember!
Remember that Composer can’t co-exist on the same server as any other View component, such as Connection, Transfer or Security Server. Even a VM with the View client or agent is out too.
You should quickly check the SQL DSN if you have time, in Data Sources in Control Panel. I’d expect this task to be completed for you, anyway.
You can add your own certificate at this point, but for this guide, I’ll just concentrate on using self signed for now.
Run the installer as an administrator and run through the steps to install the service. Remember that the user account specified as the Composer user must be a local Administrator on the server it’s on.
If you want to specify a custom certificate during the installation, see the section below on certificates.
Once Composer itself is installed and the service started, you go into View Administrator and enter in the details under View Configuration | Servers | vCenter Servers | Add. Enable View Composer, verify the correct port is specified (defaults usually work pretty well) and add the domains you wish to put linked clones into.
If you’re asked to upgrade, run the Composer 5.2 installer as an administrator and follow the prompts, it’s pretty straightforward. Choose to upgrade the Composer database when prompted.
Implement and Upgrade Certificates for View Composer. The good news is that certificates in View 5.2 are a lot less fiddly than they used to be in version 4.x. Instead of having to mess about with command line tools and bits of OpenSSL, you just get the trusted root certificate and server certificate (and intermediate certificate, if appropriate) and import them into the certificate store of the local computer (not the current user, if you have to go through the steps). This is done via MMC, adding in the Certificates snap-in.
Remember to change the friendly name of the certificate in MMC to vdm.
Import and verify the SSL certificate you want to use in MMC before you run the tool to setup Composer SSL certificates.
Stop the Composer service.
Run sviconfig -operation=ReplaceCertificate – delete=false, select the certificate you want to use from the Windows certificate store.
Restart the Composer service.
Verify Composer is running successfully.
Configure View Composer for one-way and two-way trust scenarios. My interpretation of this objective is actually quite simple (and I’m no AD expert!). If you have a two way trust then one single service account is enough in Composer to be able to provision linked clone desktops in a domain that has a two way trust with the domain that the Composer server is a member of. On the other hand, if there is just a one way trust, you may need to configure another service account in the domain where you want to create desktops, if that’s different from the domain that Composer lives in.
Adding details of Service Accounts is done from View Administrator, View Configuration, Servers, vCenter Servers, Edit and in the View Composer pane at the bottom of the dialog, click Add and fill out the service account details. This dialog can be quite pernickety, so ensure you put in the full FQDN of the domain in the top box and then username and password. If you get an error even though you know the details are correct, check this account has Administrator rights to the Composer server. Jason Langer’s website has a good example of this.
Migrate View Composer to a standalone installation. This is quite an involved process so I would imagine you can bank on this being tested on during the exam. There are several options around how migration can be performed, but what it mainly boils down to is whether or not you want to use the existing Composer database when you move the service to another Windows Server. If you already have linked clone pools then this is pretty much a given. You can either leave the Composer database where it is and point to it from the new Composer server, or you can move the database at the same time you move the Composer server. Either way, the key thing to remember here is that the Composer service uses RSA keys to encrypt and and decrypt information from the Composer database. When you move Composer from one Windows Server to another, you have to ensure the keys get carried across, otherwise you basically lose the ability to access your existing linked clone pools.
Remember Composer instances must have their own databases, they cannot share the same database but can be on the same database server.
If your current Composer instance does not have any linked clone pools defined, you can migrate Composer without worrying about maintaining database links, as there is basically nothing in there you need.
You may well be tested on both migrating Composer with an existing “populated” database and also without, so it’s worth knowing how to accomplish both goals.
Migrate with an existing Composer database – In View Administrator, click View Configuration, Servers and click “Disable Provisioning”. If you need to relocate the database elsewhere, this is when you would do it. I would expect this to be out of scope for the exam as it’s a DBA task. You then need to uninstall Composer from its current location and then export the RSA keys out, to send over to your new Composer Server. .NET and ASP.NET IIS needs to be installed on both source and target, but I think we can assume this will be done for you in advance.
On the Composer source server, open a command prompt and go to %windir%\Microsoft.NET\Framework\v2.0xxx folder (where xxx is the installed version number)
Run the key export by running aspnet_iisreg -px “SviKeyContainer” “keys.xml” -pri. This will export the public and private keys to a file called keys.xml.
Copy keys.xml to the target Composer server
Open a command prompt and go to the .NET directory as per the first step
Run the command aspnet_iisreg -pi “SviKeyContainer” “<path>\keys.xml” -exp. This command imports the RSA keys into the local key container. The -exp switch marks the keys as exportable, in case you need to export then again in future
Install Composer on the target server, selecting the appropriate SQL DSN during the installation
Configure SSL certificates for Composer as needed, as per above
In View Administrator, click View Configuration > Servers, select the vCenter Server instance that is associated with this View Composer service, and click Edit
In the View Composer tab, provide the new View Composer settings. If you are installing View Composer with vCenter Server on the new computer, select View Composer co-installed with the vCenter Server. If you are installing View Composer on a standalone computer, select Standalone View Composer Server and provide the FQDN of the View Composer computer and the user name and password of the View Composer user.
In the Domains pane, click Verify Server Information and add or edit the View Composer domains as needed. Click OK.
VCAP-DTA Objective 1.1 – Deploy Highly Available View Installations
So the first objective in the exam blueprint is “Deploy highly available View installations”. That can come in many forms. Looking at the main bullet points and the reference sources cited by VMware Education, let’s drill down into it.
Configure highly available connectivity to the View environment. So what we can we read into this objective? The reference source is the View Architecture Planning guide and the View Installation guide. My inference here is that we’re not going to be expected to manipulate any kind of load balancing or content acceleration product, and there’s no reason why we should as it’s not a core part of Horizon View.
Firstly we can ensure we reduce the single points of failure. We may be asked to add more Connection Servers if there are only individual instances. Remember to select Replica Server when being asked what type of Connection Server we wish to add. Only the first instance of a Connection Server in a replicated/ADAM group is the Standard View Connection server. Remember this, or you’re going to have problem adding servers to an existing group.
What else? Well there are the main features of vSphere such as DRS and HA which we can leverage to ensure that View Connection Servers not only come back up in the event of host failure, but also ensure the Connection Server has enough grunt to perform when lots of connections will be coming in. I don’t think it outlandish that we may be asked to configure a memory reservation for Connection Servers, after all, they’re Java based services remember and VMware’s best practice is to set a memory reservation on VMs hosting JVMs.
Configure stateful and stateless load balancing for a View implementation. What did we just say earlier, we shouldn’t be asked to configure a load balancing solution because it’s not part of Horizon View? I’m really not sure why this objective is listed in the blueprint. I’ve had a good look through the reference sources and there is nothing specifically listed there regarding stateful/stateless load balancing. I looked around for a good reference on this topic, and found a useful article at F5 which actually mentions View as well. However, some good things to remember :-
Stateless means the connection is not tied to an individual Connection Server or Pod on connection/reconnection. This can be referred to as persistence or some load balancers call this “stickiness”. No history of the previous connection is retained on the load balancer.
Stateful load balancers “distribute traffic based on L3,L4 or L7 criteria to increase traffic capacity and reliability by improving application performance”.
One caveat to the above is that I’m absolutely not a networking or F5 expert, so take the above with a grain of salt. If anyone can provide a better explanation, I’d be happy to amend this bit. To be honest, I’m not really sure what this has to do with core Horizon View apart from the behaviour on disconnect (logoff, retain session etc.)
Implement vSphere cluster isolation and High Availability rules. Now we’re back in the land where we know what we’re doing (or at least I do!). So as I mentioned earlier, one area you can look at in the area of highly available View infastructure components is to use vSphere High Availability to ensure a high level of resilience and availability for your Connection, Security and/or Transfer Servers.
Cluster isolation – what you you want to do if a host becomes isolated? The safe option is the default option of leave VMs powered on, but the exam may ask you to adopt a more aggressive stance. Bit dangerous that one, you may end up restarting a Connection Server chock full of users that can communicate on the network quite happily.
VM Restart Policy – This setting will give you ability to override the cluster level setting which is usually “medium” for all VMs. In this particular case, it’s likely you’ll have to set rules to ensure Connection/Security/Transfer servers restart first before other VMs such as desktops, remember the dependencies here. In which case, don’t overlook vCenter Server and also SQL Server, if you have that virtualised. You’ll need to group those into the first VM restarts too.
Configure a View implementation with multiple vCenter Servers. As discussed in the previous blog posting, VMware will likely use this exam to reinforce the Pod and Block reference design, so to scale your View implementation into the thousands, you need to create blocks of 2,000 desktops with their own vCenter and manage them as one. This way you don’t kill a single vCenter with lots of power management requests (power off/on/, reboot etc) as well as pool provisioning tasks.
View Administrator is the web based administration tool used to connect vCenter servers into View.
Go to View Configuration | Servers | vCenter Servers | Add and fill out the relevant details for the vCenter Server you wish to add. Note also this is where you configure View Composer settings. You may not be asked to configure this first up, but worth remembering this is where to go when dealing with the Composer based questions.
So the VCAP-DTA exam has finally made it out of beta and is now available to sit at your local (!) Prometric test centre. Now I’ve got the two VCAP-DCx exams passed and out of the way, I want to complete my desktop VCAP collection. I already passed the VCAP-DTD when it went through beta, but unfortunately missed the beta of the DTA owing to work commitments.
Anyway, feel free to download the exam blueprint here, I’m going to try and get some thoughts down on the objectives with a view to sitting the exam sometime in the next couple of months when the next discount vouchers start doing the rounds!
Exam Format
So looking at the blueprint, what can we infer? Well this exam is slightly shorter than the VCAP-DCA equivalent – only 3 hours (ha, only!) and 23 lab activities instead of 26 for the DCA. The passing score requirement is still the same, 300/500 and I’m guessing you will still have to wait for your score on completion so a real person can go and score it for you.
As per previous exams, there is a short survey at the start of the exam of 9 questions which apparently have no effect on the final score or your questions, but I do wonder what the point of it is otherwise. I always select the answer which marks me out at a total newbie in the vain hope I’ll get an easier bunch of questions. As ever, your mileage may vary and I have no evidence to substantiate my suspicions.
The blueprint makes reference of the fact you get credit for partially correct responses. It goes without saying that you should do as much as you can on a question, even if you’re running out of time or tackling a topic you might not be that hot on. At the end of the day, 10 marks could be the difference between passing or failing.
Exam Environment
The blueprint references the fact that the exam is based on VMware Horizon View 5.2. This is an important and often overlooked fact. The VCAP-DCA exam is based on vSphere 5.0, and as most of my recent experience was with 5.1, sometimes subtle differences in dialog boxes can really throw you. Make sure you study for the exam with the 5.2 version so you’re fully conversant with the interfaces, functionality and basically how to “do stuff” quickly and accurately.
There is also reference to the fact that the live lab consists of the following :-
4 ESXi hosts
3 vCenter Servers
4 View Connection Servers
“A number of pre-configured virtual machines”
From this I’m inferring that at least one objective will involve connecting a vCenter Server into the View Administrator console, so know how to do that. This emphasises the pod and block reference design that VMware publish as best practice. If you do pod and block for large deployments, you’ll need multiple vCenters.
Intended Audience
This section is again useful in providing some useful tit bits as to what you might see on the exam, or be expected to do. I picked out the following :-
Installation, configuration, administration and troubleshooting of a VMware View environment
Utilise View Administrator to create, manage and deploy desktop images
Optimise and troubleshoot “all” View components, so I’m thinking Connection Server, Security Server, Transfer Server at a minimum
Windows desktop administration including group policy, AD, DNS and DHCP. So from this I’m thinking you’ll need to know the View ADM templates and what to configure (how to optimise slow connections, for example). Also, there’s probably a good chance you’ll have to configure an OU for View desktops and some groups to add View users to, such as Remote Desktop Users. Again, all my own inference here, I’ve not sat the exam yet
Other Notes
Section 3.1 (objectives introduction) mentions the need to know VMware View and VMware ThinApp for the exam. There is no explicit mention of Horizon Workspace or any of the other suite products such as vCOps for View, so I think we can safely assume that focussing our revision efforts on the “main” View components (Connection Server, Security Server, Transfer Server, View Administrator) and ThinApp will be enough and will be all we will be tested on.
I hope you’ve enjoyed this brief intro into the VCAP-DTA exam. Hopefully over the next few weeks, time permitting, I can add some more notes to a small study guide to share with the community.
So finally, after 5 months tortuous wait, I found out I passed the VCAP-DTD the other day. Well done to everyone else who’s got it, I don’t know how many there are, but I’m guessing not that many. There are a few out there in Twitterland who tweeted their success the other day, so I’m going to enjoy it’s exclusivity for now, until more certified folks come along.
As regards the exam itself, it was a tough old boot. I sat it early January, in fact the first week back after Christmas when my brain was even more Swiss cheese than normal. Owing to Pearson Vue chopping down the number of exam centres near where I live in north west England, I had to travel across the Pennines to Leeds to sit it.
The exam itself is listed as 195 minutes. I think I came in around 10 minutes under that, but as I was so far behind time wise, I just ended up going with my gut feeling on a lot of the answers. It was physically and mentally one of the most demanding exams I’ve ever done. I wasn’t permitted to take any water into the test room, which had no natural light and was very stuffy (even in January!). I also didn’t find the exam centre staff all that welcoming, so I was glad when it was all over.
Advice? Well firstly, you need to already be a VCP-DT to sit this exam. Also, it’s not an exam you can wing. I’ve been consulting for around 3 1/2 years, and that sort of experience is priceless for this sort of exam, as there are a lot of scenario based questions you need to answer. If you’ve done this for real with living, breathing customers, you’ve already got an advantage.
You also need to know View inside out. What it can do, what it can’t do. How it integrates with other products. Some may disagree, but I think View is pretty unique in a VMware product as it has so many dependencies with other third party products such as RSA, load balancers and anti-virus. You need to know how to weave those into the solution, and not just at a superficial level. I’d say you need around 1/2 years of experience administering View, especially in an enterprise environment. The exam covers a very broad spectrum.
One more tip is to watch the sample video on the VMware Education website on the drag and drop “Visio style” design tool. The blueprint states there are six of these in the exam, and they do take a big chunk of time. Don’t get waylaid here and keep an eye on the time. The demo can be obtained from http://mylearn.vmware.com/register.cfm?course=149330 and I think the video is around 10 minutes long.
So finally I hammered together some study notes in a couple of days (I didn’t get chance to do any study over Christmas. Well, too pissed most of the time anyway!). The notes were constructed around the beta exam blueprint, so may not perfectly match the final release. That being said, I will publish them to the community, feel free to get in touch and let me know if you spot any errors or omissions. You may also distribute it, please just provide an acknowledgement if you re-publish any aspect of them. They’re not perfect, but hopefully they’ll aid your preparation.
I submitted a session on the VCAP-DTD for VMworld Barcelona, so if you haven’t voted yet, please do and hopefully I can put together a decent presentation on this there.
In the previous blog post, I discussed how LoginVSI can help benchmark your VDI or SBC environment and provide some performance metrics on where the performance bottlenecks are likely to occur when the solution is heavily loaded. As discussed previously, you’ll have the following components set up and configured:-
LoginVSI share (hosted on a Windows Server or Samba share where the Windows 7 20 concurrent connection restriction does not apply)
LoginVSI Launcher workstations (with the Launcher setup run in advance)
LoginVSI Target desktop pools (with the Target setup run in advance and Microsoft Office installed)
Active Directory script run to configure the required LoginVSI users and groups and add the Group Policy settings to those users (turns off UAC, amongst other things)
Ensure statistics logging is working properly on vCenter (assuming a vSphere infrastructure)
Once the environment has been configured and you have your pool of desktops spun up, it is recommended that all virtual desktops be left to “sit” idle for a while, this is so that they reach “steady state” before the tests commence. Steady state is essentially where all desktops have started, launched all start up services (anti-virus scanners, “call home” services or applications, Windows services) and disk activity has settled down to an idle tick, rather than thrashing as it does when it starts. What’s worth bearing in mind is that if all virtual desktops are on the same datastore that it may take several minutes for steady state to be reached, depending on disk latencies. In my particular tests, I had between 100-120 desktops spun up at once and I left the pool to sit for around 20 minutes before running any LoginVSI workloads.
How do you know if steady state has been reached? I used the vSphere client to look at CPU and memory usage of each virtual machine and waited until the utilisation dropped down to a minimum. After a few test runs, you will start to get an idea of where steady state is, as each desktop build is slightly different, depending on applications and services installed. It’s not imperative you do this, but if you read the white papers produced by the major VDI stack vendors (Microsoft, Citrix, VMware, NetApp etc.), you will find this is something they tend to do.
At this stage, it’s often prudent to perform a few test runs, just to ensure that everything is running as you expect. You can also use these test runs to perform some workload tuning, such as time delays between sessions starting. As discussed in the previous post, if you set this value too aggressively, you can saturate your hypervisor host very quickly, and this can negatively skew results. Plus, is this the reality of how your users will use your VDI environment? Is it likely that you will have 100 users logging in a near simultaneous manner in a three or four minute window? In most cases you’d probably say no. The obvious exception to this would be an educational environment, in which dozens (even hundreds in a University or College setting) of users would login at the same time and start several applications after login. In a commercial or non-academic environment, generally users login over a much larger time frame and even when they’re logged in, they are far more inclined to make long phone calls or make a coffee, resulting in significant periods of idle time.
As a tip, use the calculator built into the Management Console to compute the time delays between the number of sessions and make sure they represent “real life” numbers, such as a login every 6 minutes etc.
During my testing with a customer, we would make a single environmental change and then analyse the results – for example, changing the amount of memory given to the virtual desktops (1.5GB vs 2GB, for example), or an extra vCPU, or a change to the underlying storage fabric. In this respect, LoginVSI can also be used to model environmental changes, a “what if” type of analysis. This can be especially useful if you are conducting a performance analysis of new storage to validate a vendor’s claims, or a “what if we add 20 more virtual desktops to this host” scenario.
VSIMax
The end goal is the result of the VSI Max, which is essentially the “tipping point” of performance. This is established in a way that I still don’t truly understand (and I read the explanation several times!), but in essence is calculated by capturing the delay intervals in between performing tasks in the target workload. There are embedded timers within the workloads that spawn activities such as reading Outlook messages, or playing a Flash video and the intervals between activities are randomised, so as to imitate real life usage. A baseline average response time is calculated and when delays increase, the VSI Max value is obtained. This value basically represents the maximum number of virtual desktops per host before performance significantly degrades.
In our particular test case, we were looking to achieve a density of 100 desktops per vSphere blade. This figure was reached after a capacity planning exercise – so VMware’s Capacity Planner was deployed to a bunch of workstations in a “knowledge worker” use case – users who generally have medium to high task demands – using Outlook to send messages, opening large spreadsheets, manipulating graphics intensive slide decks etc. As a result, 100 desktops was considered an appropriate density based on the Capacity Planner results and the specification of the hypervisor hardware.
The VSIMax validates the design of the solution and gives both the solution architect and the end users/customers confidence that the VDI solution is fit for purpose. The graphic below shows the output from three tests run that validate the design for 100 desktops. You will need to install the VSI Analyser to compare the results, using the Comparison Wizard:-
The comparison of three runs to demonstrate that the design scales to 100 desktops before performance suffers
Running The Tests
I’d recommend running at least three iterations of your test cycle to ensure a reliable result. What you should find is that each result is generally quite close together and this way you can average out the VSIMax over the three runs of the test. That being said, on odd occasions you may see freak results (generally at the lower end of the performance spectrum) and it’s worth discarding this result and performing another test iteration. This can happen for a variety of reasons, such as the pool not being in a steady state, for example. Several simultaneous power cycle operations on a pool can cause performance degredation.
Analysing Bottlenecks
So let’s say you’ve built your solution to meet the needs of a 100 simultaneous virtual desktop connections, but your VSIMax figure averages out well below that figure (worryingly so!). Where do you go from here? At this stage, this is where performance of the hypervisor host comes into play. In our particular test, the hypervisor in use is vSphere. This is good because vCenter automatically collects performance statistics and stores them in the database, so we don’t need to babysit real time statistics to know where the bottleneck is, we can just look back restrospectively in vCenter.
The main areas to look at first for performance bottlenecks include:-
Processor
Memory
Storage
There are other metrics we can look at, but it’s likely that in a high proportion of cases the bottleneck has been caused by one of the three main resources listed above. Looking at processor first, we can obtain graphs from vCenter for the lifetime of the test run (so please make sure you make a note of the start and stop times of the tests!). Export the information and select the processor, memory and datastore check boxes so we keep data to a minimum to start with.
CPU Performance
Performance output from vCenter for CPU performance during Login VSI tests
Looking at the graph above from vCenter, we can see variable saturation of processor resource. The main takeaway from this result is that CPU utilisation never exceeds ~65%, so we can see quite clearly from the off that CPU is not the limiting factor in this particular test scenario.
Memory Performance
To continue the investigation, we now need to take a look at the memory resource to see if this is the constraining resource. As we can see from the chart, again memory is not the issue. Although the memory usage hovers around maximum, it is a little below.
Memory performance showing that utilisation is constantly under 24GB
20GB of physical RAM is available in the ESXi host, and as we can see by the performance chart, memory is heavily utilised for most of the test but does not max out. So taking into account CPU and memory performance during the testing, we have enough spare capacity in these resources to service 100 virtual desktops. We’re making good progress in ruling out the performance bottleneck, but we haven’t found it yet! Onwards to the datastore performance charts!
Datastore Performance
Looking at the performance charts for the datastore, we can clearly see an issue with performance straight away. The chart shows high latencies for both read and write performance, in the worst case we can see a latency of 247ms for write operations to one datastore in use.
Performance statistics showing a high disk read and write latency for the datastore
So the question here is, what is an acceptable disk latency? In broad terms, the following values are a reasonable rule of thumb :-
Sub 10 ms – excellent, should be the target performance level
10-20 ms – indicates a problem, may cause noticeable application/infrastructure issues
20 ms or greater – indicates unacceptable performance, applications and services such as virtual desktops will exhibit significant performance issues
Depending on your workload, you may well see spikes in performance at the storage level. These spikes can be acceptable as by definition they are sporadic and rare and generally do not impact long term performance. Microsoft lists acceptable disk latency spikes for SQL Server as 50ms, for example. I don’t know I especially agree with this number, but they know SQL Server a lot better than I do!
Performance Conclusions
Looking at the performance charts, we can see that the disk is the bottleneck. The latencies at the disk level are quite severe, and would result in a much lower VSIMax value than what was originally planned for. If we can add bandwidth to the disk layer, we can improve the density of virtual desktops per hypervisor host. In this case, we had local SAS disks in a RAID1 configuration. Even though third party storage appliances were in use to try and improve throughput, the physical disks themselves could not sustain the level of performance required.
As such, the desktop pool was moved to SAN based storage, which was a Fibre Channel storage on a NetApp storage device. One LUN was configured to host the desktop pool datastore, in a one to one relationship, as per best practices. As the storage now in use is enterprise grade, we would expect the disk latencies to be significantly reduced. As mentioned before, LoginVSI can be a really useful for tool modeling configuration changes and their impact and this is a good example. We’ve already proved that CPU and memory are not fully utilised, and that the disk latencies are causing a lower than expected VSIMax value.
Datastore performance statistics when the desktop pool is moved to SAN storage from local disk
The performance graph for a virtual desktop datastore on the NetApp datastore shows a much reduced latency of (on average) under 1 ms. As stated previously, any latency under 10ms is excellent, anything sub 1 ms is jet propelled! Now we have identified and removed the performance bottleneck, our VDI solution will scale to the required number of 100, as per the original design. Obviously CPU, memory and datastore are only a subset of the possible performance metrics we could have obtained, but any bottleneck is most likely to be around those resources.
Also, we could look at such metrics as network, but we’d be most likely to look at those metrics if for example mouse movement was delayed, or keystrokes were slow. In a LoginVSI test scenario as the virtual desktops are designed to be “stand alone”, there should be minimal network traffic anyway.
Hopefully the two posts on LoginVSI have provided some guidance on how you can benchmark your environment, and also identify and rectify any bottlenecks that prevent you from scaling to the designed limits. I’d quite like to present this topic as a slide deck at a VMUG somewhere, sometime. Please let me know if that’s something you’d like to see!
As I mentioned in a previous post, I’ve spent the last few weeks working with a product called Login VSI. What does it do? Well it essentially forms part of a virtual desktop deployment toolkit in the sense that it helps to benchmark performance of a VDI or SBC (Server Based Computing, such as Remote Desktop Services/Terminal Server) environment and essentially provide accurate end user performance metrics (OS and application response times) to outline the “tipping point” in performance of a VDI deployment.
For those who’ve already done several VDI deployments, you’ll already know the level of detail (and in some senses, educated guesswork) that goes into designing a solution. The types of questions posed include :-
– How many desktops do I need?
– How many IOPS do I need?
– How many physical disks do I need to provide the amount of IOPS?
– What sort of user metrics do I have from desktop assessment phases of the project?
– What are the requirements on the network fabric?
There are a lot more questions along similar lines, but all are important in the design of the solution to ensure it is fit for purpose. Once all numbers have been crunched, a design comes out of the other end that we hope will cut the mustard when it’s put into production.
Login VSI can help in this instance because it simulates users logging into the SBC/VDI environment and performing tasks expected of end users. As such, there are several pre-defined workloads that can be used to simulate real life examples. For example, the medium workload (which comes with the free licence) simulates a user logging in, browsing their Outlook mailbox, manipulating a Word document, PowerPoint presentation, Excel spreadsheet, PDF document, ZIP archive and website browsing with a Flash component (Kick-Ass trailer, which is a very funny movie if you haven’t seen it already!). Timers are built into the process to simulate random wait times when a user drinks coffee, sends a text or talks to a colleague, for example. There’s nothing so random as a human being, so it’s not precise but it does represent a “scattered” workload as you’d see in reality.
LoginVSI Architecture
The refreshing approach from Login VSI is that you don’t need to spin up a SQL Server to capture your performance metrics and environment configuration (don’t you just get tired of having to commission a SQL box every time you need to fart?). This means that as well as reduced initial cost, the complexity is lower and the time to be up and running is reduced. All you need to provide are four elements :-
– LoginVSI Share (can be anywhere on the network, but must be reachable and writable by all devices used in the test)
– Login VSI Launcher (Windows machine that can be physical or virtual, which essentially performs the logins and spawns the test workloads)
– Login VSI Target (Windows machine that has MS Office pre-installed, along with some other tools such as Flash Player, BullZip, Internet Explorer)
– Active Directory (a Login VSI OU is created, along with a Group Policy Object and some scripts that get copied into the NETLOGON share)
The good news is that you don’t need to rummage around dusty corners of the internet to get these tools, each of the four parts above some with their own installer. A handy graphic lifted from Login VSI’s website below illustrates the simple architecture of the product :-
LoginVSI Configuration
One thing that caught me out was that my VSI Share was on a Windows 7 machine. This would be fine on a very small scale, but I was caught out by the fact that Windows 7 shares do not permit more than 20 simultaneous connections. Login VSI exhibits the behaviour that the target sessions starts and the user logs in, but the desktop just sits there and does not spawn any application sessions. This had me confused for quite a while as there are no error messages as such. If you go to one of the stalled desktops, unlock KidKeyLock (by typing vsiquit) and type in the UNC path of the VSI Share in Start | Run, you will see an error about the number of concurrent connections to a Windows 7 share. Save yourself a lot of time and put the VSI Share on a Windows server or Samba share!
In a VMware View or XenDesktop environment, you need to run the target setup routine on your master image before you spin up a desktop pool/catalog. This ensures that all of the desktops to be tested have all the appropriate software installed. You also need to ensure you have Microsoft Office installed in advance. Any version from 2003 upwards is fine, but if you’re testing Office 2007, it’s recommended to install SP2 beforehand, as there are some known issues with Outlook that are resolved by this patch.
Once you have your VSI Share, your launcher workstation(s) (each launcher will take a maximum of 50 targets, though my testing tended to work better with a maximum of around 35) and your targets, you’re pretty much set. The next stage from here is to configure your environment using the Management Console. The main points of interest here are configuring the launcher names and configuring the workload settings, such as workload type (light, medium etc.) and also peripheral settings such as the Microsoft Office version (if the wrong version is listed, this can prevent the automated workload from running successfully). The management console itself is pretty straight forward and self explanatory.
Configuring the connection string, number of sessions etc.
The screen shot above shows the test configuration. This is where the workload type is selected (Light, Medium etc.) and also connection settings to the VDI environment. As you can see from the above screen shot, Python is being used to connect to a Citrix XenDesktop web interface. This is because the login screen for Web Interface had been customised, and the Citrix connector for Login VSI could not recognise buttons on the screen such as login and selecting the available desktops. Citrix themselves provide some Python scripts to provide connectivity and these work just fine. In a View environment, the existing Login VSI connector would probably work just fine, as would a “vanilla” XenDesktop environment.
The next step before actually getting to the testing phase is to define your launcher machines (use the Windows NetBIOS name, rather than a DNS name or IP address, or you’ll likely see a few errors) and configure what settings you want for the workload itself. In my experience, the only setting you really need to look at is the Office version string, so 14 for Office 2010, 12 for Office 2007 and 11 for Office 2003. The screenshot below illustrates the settings.
Defining the launcher workstations in the Management ConsoleDefining the workload settings in the Management Console, including the Office version string.
Further Steps
You also have the option of creating custom workloads, but this is not something I have experience of and to be honest, not something I really had a need to use. If you just need some general benchmarks from your VDI environment, the Medium workload is recommended and used by most vendors when they produce performance white papers for their VDI solution (See Microsoft, Citrix and Equalogic for examples).
At this stage, I’m not going to get too invested in the nuts and bolts of how the whole process works, but needless to say if you’ve got this far, you’re pretty much ready to go. None of the workloads require access to the internet, nor do they require a connection to an Exchange server or any other network location. All workloads are fully isolated and self contained. If you’ve done all the setup and configuration successfully, you’re now at the stage where you can actually run some tests. Consult the Login VSI documentation for session specific settings, such as number of sessions, time delays between starting sessions (try and make this value sensible, so you don’t saturate your VDI hypervisor within a few minutes of starting the test, although if you’re simulating an academic environment, this may be important to you).
Once you’re ready to start the sessions, you should have the launcher agent running on your launcher workstations (a command prompt box that pings the VSI share for work to do) and all target machines spun up and ready to be logged into. In part two of this blog, I’ll tell you more about how to interpret the results. Stay tuned!


You must be logged in to post a comment.