
Upgrading the home lab Part I : vCenter Server
vSphere 6.0 has finally shipped, so I decided to take the plunge and upgrade the home lab to vSphere 6.0. In the next couple of posts, I’ll outline the steps required to perform the upgrade, plus any issues I encountered along the way. I think most people know that most articles I write are focused around VDI, so let me express this straight out of the gate. vSphere 6.0 does not support Horizon View until release 6.1. So basically, don’t upgrade any environments to vSphere 6.0 where View is in use, stuff will probably break. When is View 6.1 out? I don’t have a clue right now, but seeing as the release notes have been posted up, I can’t imagine it’s too far away.
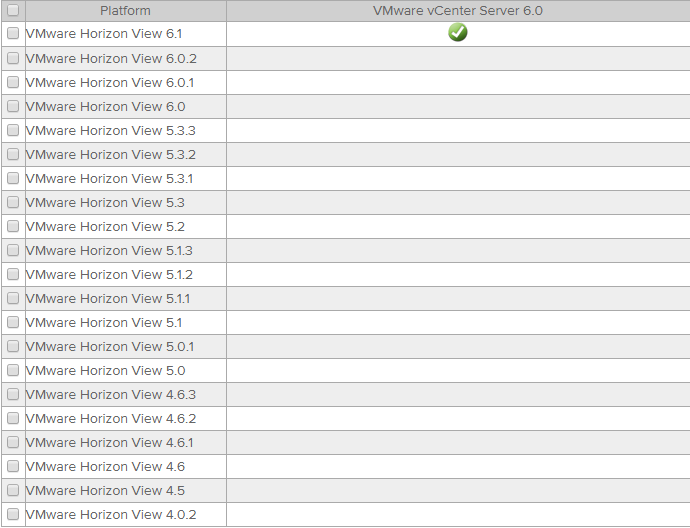
If you’re project planning and you need to have certified upgrade paths (I know some project documentation requires this in some companies), the current (at the time of writing) interoperability matrix result is shown below:-
So my home lab is a very simple affair indeed. It comprises a single host which is a Dell PowerEdge 1435SC with 32GB RAM and two Opteron processors. Old hat I know, but it gets the job done. For those wondering how I deal with power management on such old kit, it’s simple. I turn the bugger off when I’m not using it! As I’m often on the road, I don’t see a lot of value having the beast humming away in the attic when I’m not around to use it.
Anyway, that aside, it’s currently on ESXi 5.5 U2 and runs the vCenter Server Appliance. I chose the appliance because it’s quick and simple, and I don’t have to faff around with Windows licenses. I know Linux quite well, so I don’t have any fear knocking around on the command line. In vSphere 6.0, the back end architecture of vCenter changes somewhat. If you recall, in vCenter 4.x and 5.0, everything was pretty much just baked into one installer. In vSphere 5.1 and 5.5, Single Sign On was broken out (and made good in 5.5!), as was the Inventory Service to provide a more modular environment should you wish to break things out a little for scalability and to mitigate the “all eggs in one basket” factor.
Further to that, vCenter 6.0 now has the concept of the “Platform Controller”. Put simply, the Platform Controller are infrastructure or access services such as SSO, License Service, Lookup Service and the Certificate Authority. vCenter Server is basically everything else, so Inventory Service, PostgreSQL, Web Client, Dump Collector, et al. For my simple purposes, I’m just going to upgrade from my current vCenter 5.5 appliance to the 6.0 appliance, I don’t really need to start making the design overly complex. In fact, because it is just a lab environment, I’m not massively bothered if the upgrade process blows up, I can just rebuild from scratch. Obviously in a live environment, I’d be slightly more circumspect!
One important caveat to note is in the VMware documentation:-
You cannot switch the models after deployment, which means that after you deploy vCenter Server with an embedded Platform Services Controller, you cannot switch to vCenter Server with an external Platform Services Controller, and the reverse.
For full information of the pros and cons of either method, please refer to the product documentation. I’m not going to go into that level of detail here. What is reassuring for me with my one host and a dozen VMs is the following comment in the documentation:-
vCenter Server with an embedded Platform Services Controller is suitable for most environments.
Cool, I feel kind of validated now. I couldn’t see at first blush how the sizing of your environment effects your design decision, I suspect it’s more to do with geographical constraints, multiple vCenters and other VMware products that integrate with it, such as vRealise Automation. More on that in the future once I understand it better!
The Appliance Upgrade Process
The process of upgrading your vCenter appliance from 5.x to 6.0 is actually more of a migration than an upgrade. In essence what you’re doing is spinning up a new appliance as 6.0 with temporary IP address information, using SSH to copy over the database from the source 5.x appliance (and historical data if you so choose), changing the target appliance’s IP address to the source’s address and then dropping the source 5.x appliance.
Meeting Prerequisites
As you might expect, there are several prerequisites to be met before actually copying over any files or making any changes. First and foremost – have a backup and no, a snapshot is not a backup! By all means take a snapshot of your vCenter Server prior to starting the process, but have a block based backup too, whether that’s via Veeam or any other backup method. Don’t rely on snapshots. If you do, you’re upgrade deserves to fail!
Again the product documentation is the best place to refer to, as I’m sure over time these will change as experiences come back from the field when the product is being deployed. Once pre-requisites have been met, we’re hot to trot and ready to install our vCenter Server 6.0 appliance.
Download the appliance ISO file from MyVMware (at the time of writing this is VMware-VCSA-all-6.0.0-2562643.iso) and you may notice from the off we’re not downloading an OVA/OVF as we did previously. This is because the upgrade method is slightly different. Instead we’re going to take the ISO and mount it locally on our Windows machine (if you’re on Windows 8.1, you can right click and select Mount to mount the ISO to your DVD drive) as shown below:-

Alternatively, you can right click and extract with 7-Zip (for example) and create a source directory of files. However, for my purposes, I’m going to keep it simple and mount the ISO in Windows. Once mounted, we need to navigate to the DVD drive and go to the \vcsa folder. In here is the installer for the Client Integration Plugin, which we will need for this process. As a good habit, don’t forget to right click the installer and select “Run as Administrator”, as shown below:-

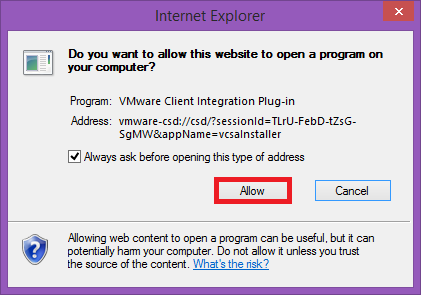
You’ll need to close any running browsers as plugins are installed, and then step through the simple installer, which should take just a minute or so. Once this install is complete, no reboot should be required and we can jump back into the root of the installation DVD and run the main installer vcsa-setup.html. I ran this with IE, I don’t know how well it works with other browsers. You will need the browser plugin access to start the installer, so click “Allow” (if you’re using IE):-
You should then be greeted with the option to install or upgrade. If you don’t see this screen, go back and check your client integration plugin installation (a reboot may help):-

Time for another quick sanity check at this point that the pre-requisites have truly been met. In my case I’m running a 5.5 version of the virtual appliance, as shown below:-

so I’m good to go:-

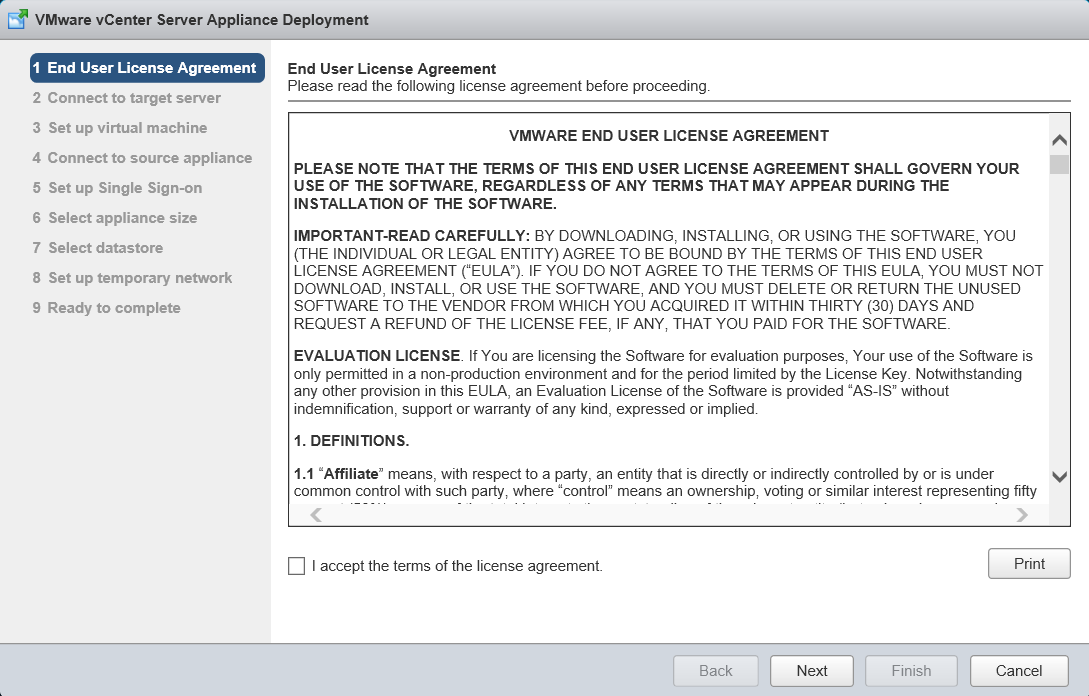
Now to the meat and potatoes of the installer itself, and a nine part wizard now has to be negotiated in order to kick the upgrade process off. First up is the usual EULA. I read this thoroughly (twice!) and consider myself happy with it and click “I accept..” and click Next:-
Next I need to input details of the ESXi host to which I’d like to push out the new virtual appliance. Note the caveats listed at the bottom of this step – disable lockdown or maintenance mode and if you’re using a VDS, initial deployment of the appliance must be to an ephemeral port group. Click Next:-

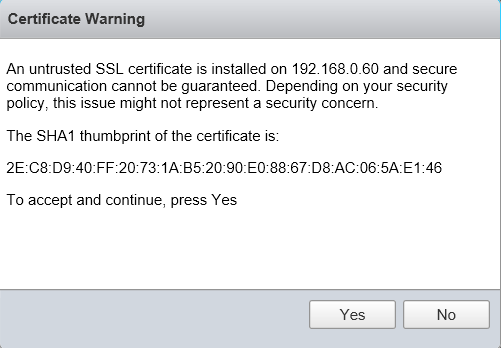
Accept the certificate warning by clicking Yes in order to continue:-
Your host credentials will then be validated as shown below:-

Step 3 is setting up the appliance name and SSH options. I’m calling mine the highly imaginative and original name of “vCenter” and I’m turning SSH on because it’s a lab and I’m not massively fussed about security. In the real world, leave this disabled unless you specifically need it. Click Next to proceed.

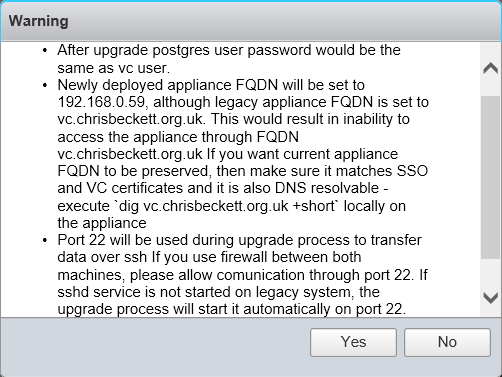
Step 4 is configuring the source information for the migration, so your existing vCenter Server. In this screen you need to enter IP/DNS details of the current appliance, version number, your administrator@vsphere.local SSO password (and if you’re a buffoon like me and forgot what the password was, you can reset it using this KB!), the root password for the appliance and host information along similar lines. You can optionally choose to migrate performance and other historical data. I’m going to enable this option, and I can’t think of any great reason in the real world why you wouldn’t do this (unless your database is mah-oosive). Before you proceed, check the caveats at the bottom of the page – that lockdown mode and maintenance mode is disabled and the source appliance’s DRS setting is disabled so it doesn’t move off that source host part way through. Click Next:-

Once the credentials have been accepted, take care to check the information presented to you on what happens post upgrade. The new appliance will inherit the old appliance’s IP address. Also make sure no firewalls prevent SSH access between both appliances as this is the transfer method used during the migration/upgrade. The installer will start the SSH process will be started on the source appliance if it is not already running. Click Yes:-
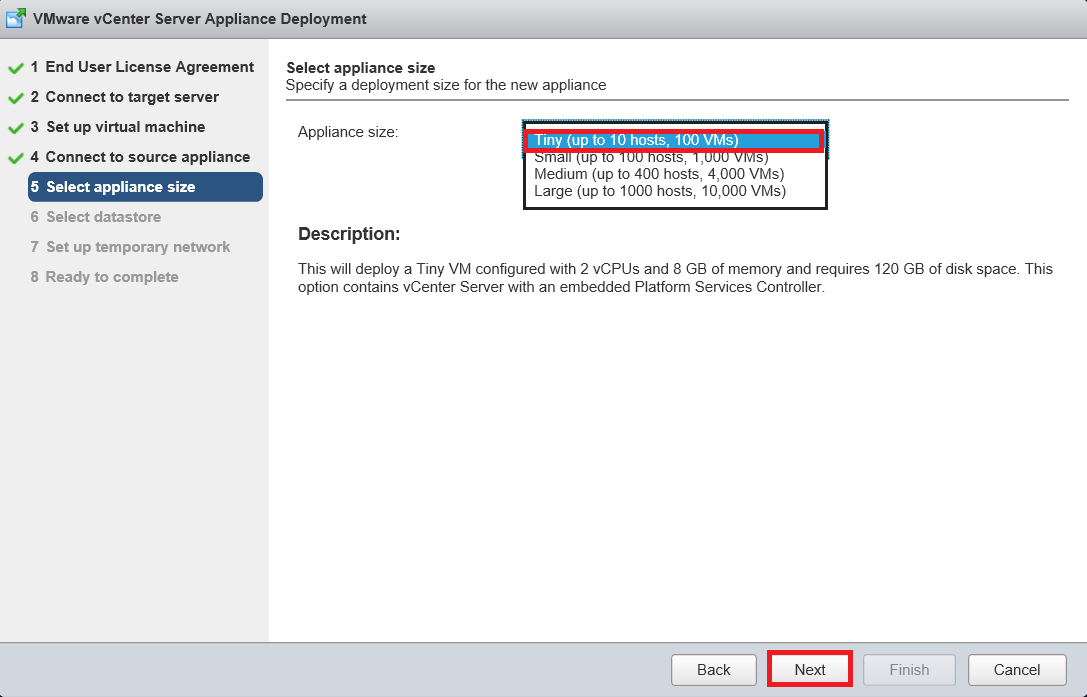
In step 5, we have the choice of choosing what size appliance we’d like. This is pretty similar to the Windows based installation and helps determine JVM heap sizes are set appropriately, amongst other things. I feel quite inadequate choosing the “Tiny” option, but it is what it is and I have no requirement to go any bigger than that. Size clearly is everything in this case. Make your selection as appropriate and click Next:-
Step 6 is choosing which datastore you’d like the appliance to go on. I’m going to choose the one with the most available space and I’m also going to thin provision it. This appliance won’t be doing a great deal in my lab and the datastore isn’t likely to fill up quickly, so I have no real need to thick provision here. Click Next:-

Step 7 is the creation of some temporary network details for the new appliance as this is a migration really as opposed to an in place upgrade. In this step, we should pick the same port group as the source appliance and use the same subnet as well if possible, especially if the data migration is going to be large. My database is small and it’s a single host, so speed shouldn’t be an issue. Fill out the details appropriate to your environment and click Next:-

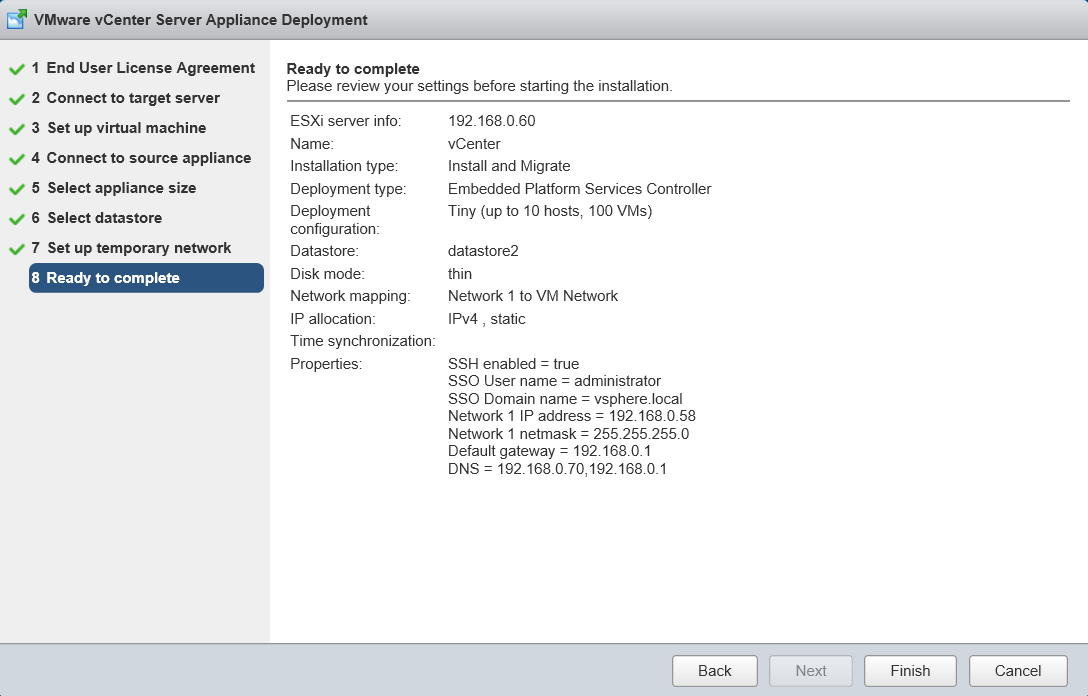
Step 8 is the “Ready to complete” or final sanity check. Review the information presented and check for typos, wrong IP addresses, what size appliance you need (sometimes “Tiny” just ain’t enough!) and when you’re happy, click Finish:-
All being well, the process should start by initiating the appliance deployment to your ESXi host as below:-

You can also monitor what is going on by connecting to the ESXi host with your vSphere Client and clicking on the “Events” tab of your target appliance, you should see something similar to below:-

And some while later, I was greeted with the following screen. The process took around an hour, but bear in mind this is a “tiny” and simple deployment. Larger enterprises should budget a lot more time for this process when migrating between appliances:-

I double checked my “old” appliance has been powered off, and the new appliance is up with the original appliance’s identity:-

Once the install is completed, you may like to perform some housekeeping before you put the appliance into production. By default, my appliance came up with the DNS name localhost. I don’t really want that, so I quickly logged into the appliance console to change it. Something you may notice that’s new is that the vCenter appliance has now been set to behave just like an ESXi host, so once you press F2 to customise the system and entered the root password, the menu structure should be something that’s pretty familiar:-
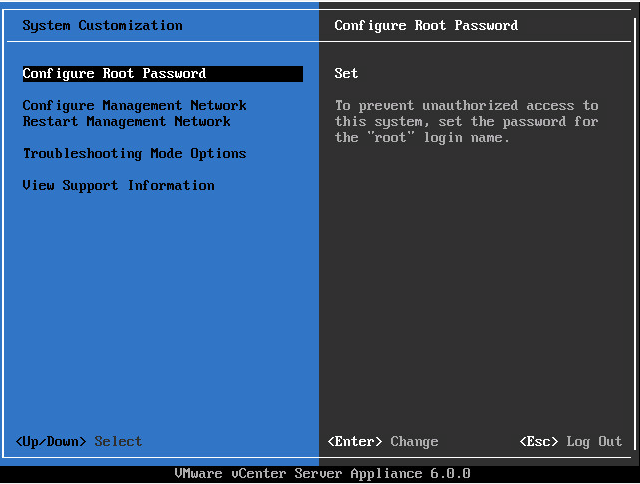
I like that VMware use a different colour scheme on the appliance to save any confusion with connecting with an ESXi host. Even though you can see it’s the appliance at the bottom of the screen, with many screens open it may help prevent costly mistakes! To go back to the original housekeeping, go into Configure Management Network and then DNS Configuration. Input the appropriate values for your appliance, as shown below:-
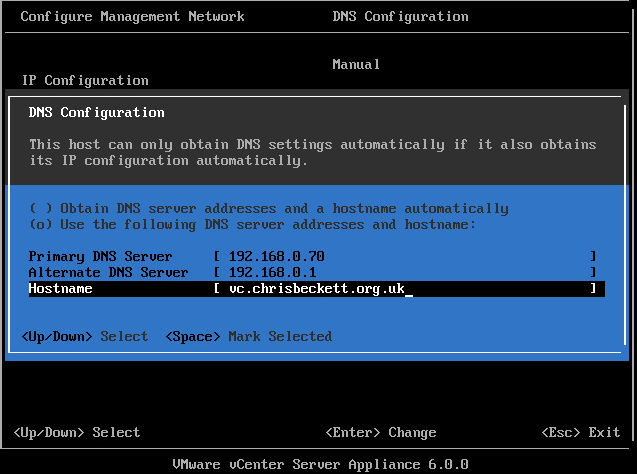
I also like to disable IPv6, though there is a mixed bag of opinion on this. I say if you don’t use it, don’t enable it. However, this is a subjective thing and purely optional. To disable IPv6, go into Configure Management Network and then into IPv6 Configuration. To disable it, hit the space bar to uncheck the box as shown below and restart your appliance.

Once rebooted, you can see we’re up to vCenter 6.0!
Post upgrade issues
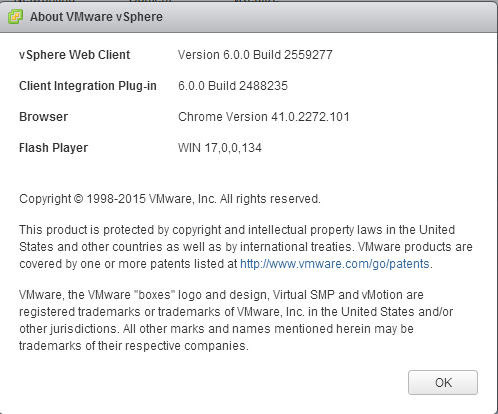
I have only really come across two issues so far – firstly I got an “Error #1009” which I cleared by deleting cookies etc from my web browser (and also upgrading the Flash Player in Firefox to the latest version).
As you can also see from the above screen shot, I was having issues with the Client Integration Plug-In. It was definitely installed from when we started the migration process, and all three browsers I had reported the issue (IE11, Firefox, Chrome) so I uninstalled the plug-in from Add/Remove Programs, rebooted, downloaded the plug-in again from the Web Client login page, installed it and as you can see below, all was good:-
Conclusion
In conclusion, I’d say well done to VMware for streamlining the upgrade process for the vCenter appliance. Yes, it has a couple of quirks and yes you should ensure all pre-reqs are met, but by and large I was pretty impressed with the whole process. Next up, my ESXi host….!
